Outlook에서받은 편지함 규칙 만들기 및 편집
받은 편지함 규칙을 사용하여 특정 폴더로 이메일을 이동하거나 개별 메시지의 중요도를 변경하는 등 수신 이메일에 대한 작업을 자동으로 수행합니다. 규칙을 사용하면 메시지를 수동으로 이동하지 않고도 메시지를 구성, 지시 및 정리할 수 있습니다.
사용중인 이메일 플랫폼에 따라 적절한 탭을 선택합니다.
새 규칙 만들기
- 웹용 Outlook에 로그인합니다. Microsoft 365 이메일 주소와 암호를 사용하십시오(GoDaddy 사용자 이름과 암호는 여기서 작동하지 않음).
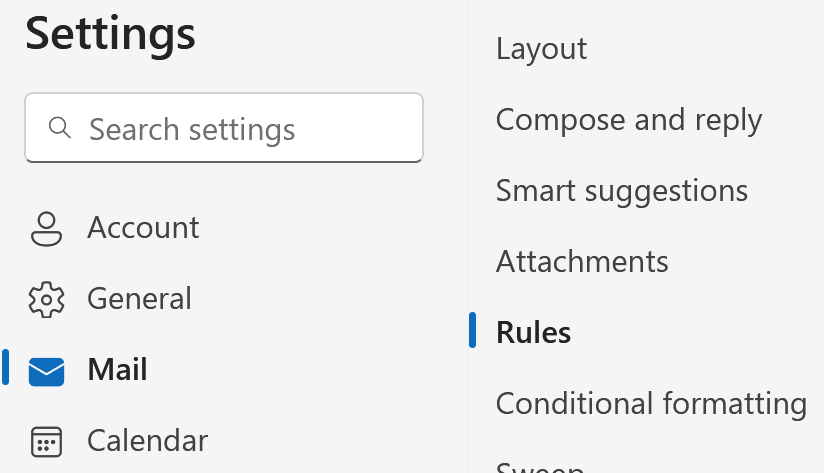
- 오른쪽 상단에서
 설정 .
설정 . - 메일을 선택한 다음 규칙을 선택합니다.
- + 새 규칙 추가를 선택합니다.
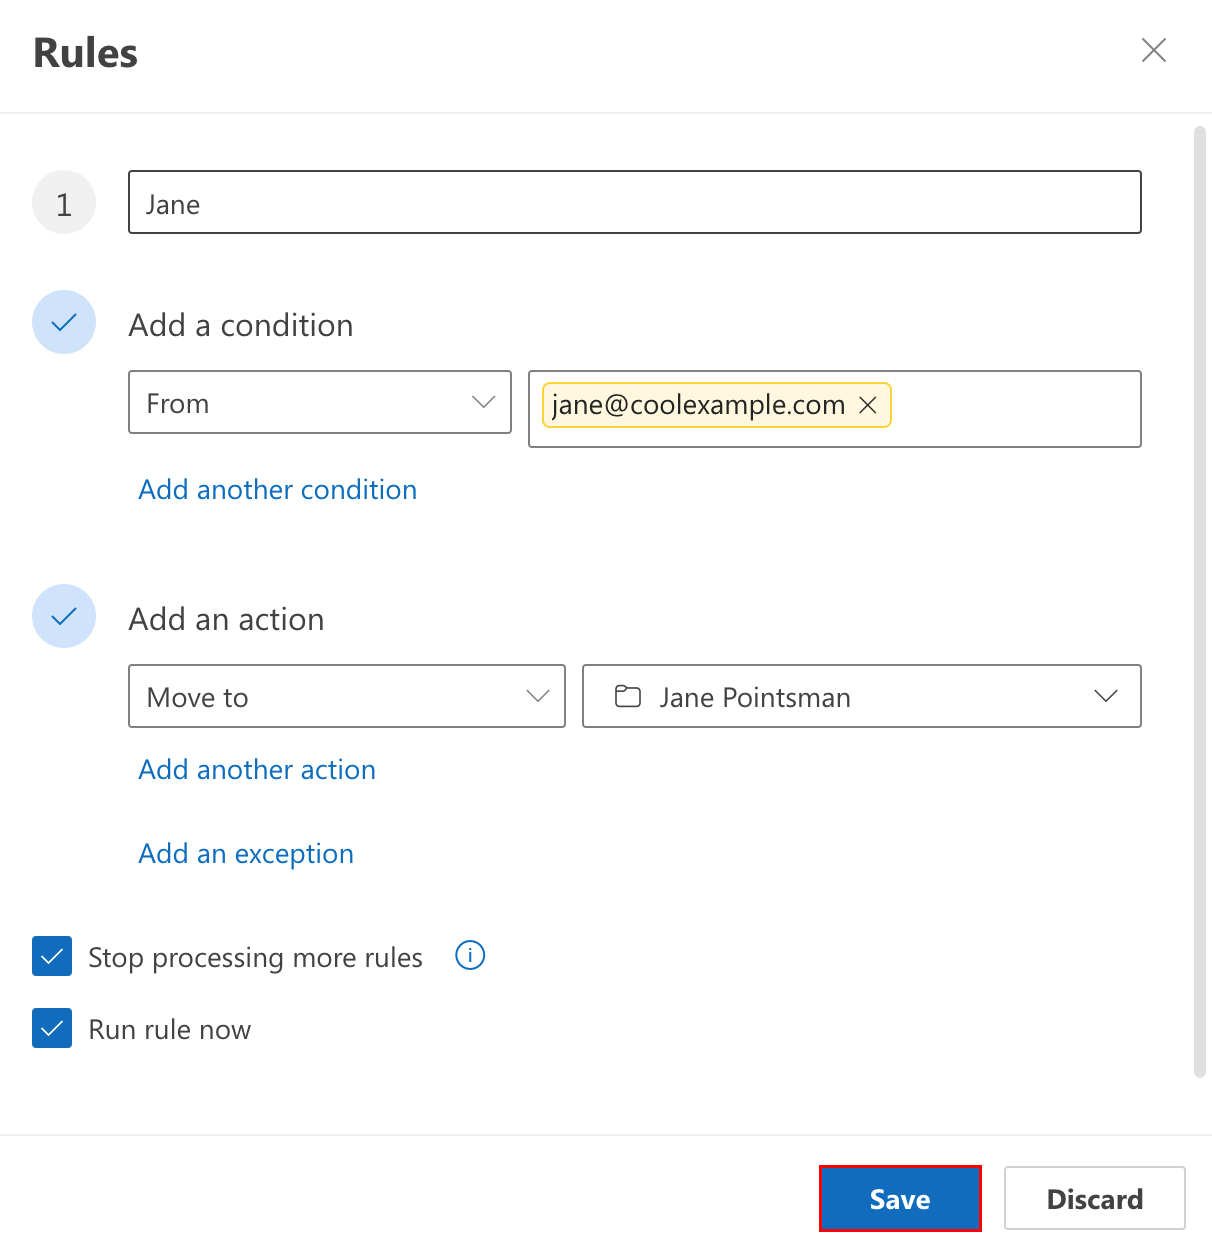
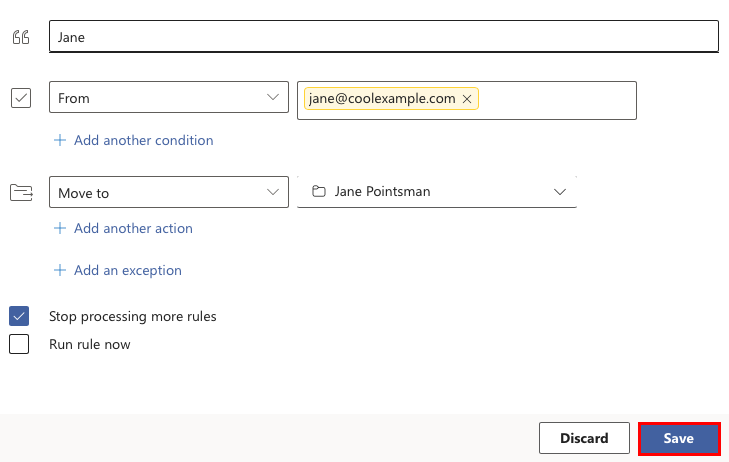
- 규칙의 이름을 입력합니다. 규칙이 수행하는 작업을 쉽게 식별하는 데 도움이되는 제목을 사용합니다.
- 규칙을 실행하도록 트리거하는 조건을 선택합니다. 예를 들어 모든 메시지 또는 특정 날짜 또는 보낸 사람의 메시지에 대해 규칙을 실행합니다.
- 규칙이 트리거 될 때 발생할 작업을 선택합니다. 예를 들어 규칙이 실행되면 메시지가 전달되거나 읽은 상태로 표시되거나 다른 폴더로 이동됩니다. 참고 : 설정하는 규칙 유형에 따라 예외 및 추가 조건을 추가 할 수 있습니다.
- 이 규칙 이후에 다른 규칙을 실행하지 않으려면 더 많은 규칙 처리 중지 옆의 확인란을 선택합니다. 이후의 규칙은 메시지에 적용 되더라도 무시됩니다.경고 :
예 : 상사의 이메일 메시지를 폴더 로 이동하는 규칙과 첨부 파일이있는 메시지를 삭제하는 규칙이있는 경우, 첨부 파일이있는 상사의 메시지는 이동 및 삭제되지 않도록 할 수 있습니다.
- (선택 사항)받은 편지함에 이미있는 메시지에 대해 규칙을 실행하려면 지금 규칙 실행 옆에있는 확인란을 선택합니다.
- 저장을 선택합니다.
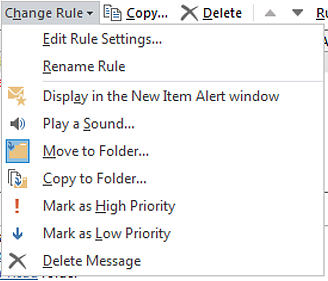
기존 규칙 편집 또는 실행
- 웹용 Outlook에 로그인합니다. Microsoft 365 이메일 주소와 암호를 사용하십시오(GoDaddy 사용자 이름과 암호는 여기서 작동하지 않음).
- 오른쪽 상단에서 설정 .
- 메일 을 선택한 다음 규칙 을 선택합니다.
- 편집하거나 실행할 규칙을 찾습니다.
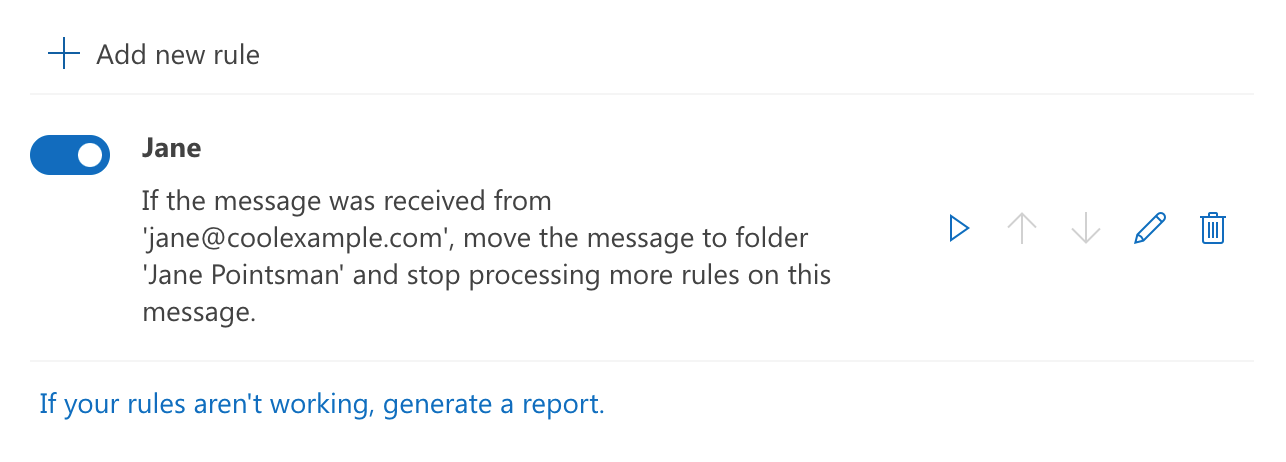
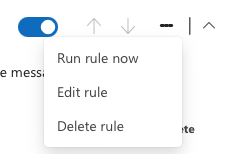
- 규칙 옆에서 다음을 수행 할 수 있습니다.
 규칙 비활성화 또는 활성화 : 토글을 전환하여 규칙을 켜거나 끕니다.
 지금 규칙 실행 : 모든 관련 메시지에 규칙을 적용합니다.
 규칙 편집 : 규칙 의 이름, 조건 또는 동작을 변경합니다.
 규칙 삭제 : 수신 메일에 더 이상 적용되지 않도록 규칙을 삭제합니다.
이제 Windows 용 Outlook에는 새 Outlook과 기본 Outlook의 두 가지 버전이 있습니다. 아래 단계를 계속 진행하기 전에 사용중인 버전을 확인 하세요.
새로운 전망
이 섹션의 단계가 작동하지 않으면 아직 새 Outlook을 사용하지 않을 수 있습니다. 대신 기본 Outlook 섹션의 단계를 시도해보세요.
활성화하면 이메일 에센셜, 이메일 플러스 또는 온라인 비즈니스 에센셜과 같은 추가 이메일 플랜을 추가 할 수 있습니다.
새 규칙 만들기
- Outlook을 엽니다.
- 메시지 목록에서 규칙을 만들 메시지를 마우스 오른쪽 버튼으로 클릭하고 규칙을 선택한 다음 규칙 만들기를 선택합니다 .
- 해당 보낸 사람 또는 보낸 사람 집합의 모든 메시지를 이동할 폴더를 선택한 다음 확인을 선택합니다.
- 특정 발신자 또는 발신자 집합에서 폴더로 메일을 이동하는 것 이상의 작업을 수행하려면 추가 옵션을 선택합니다. 규칙 창이 열립니다.
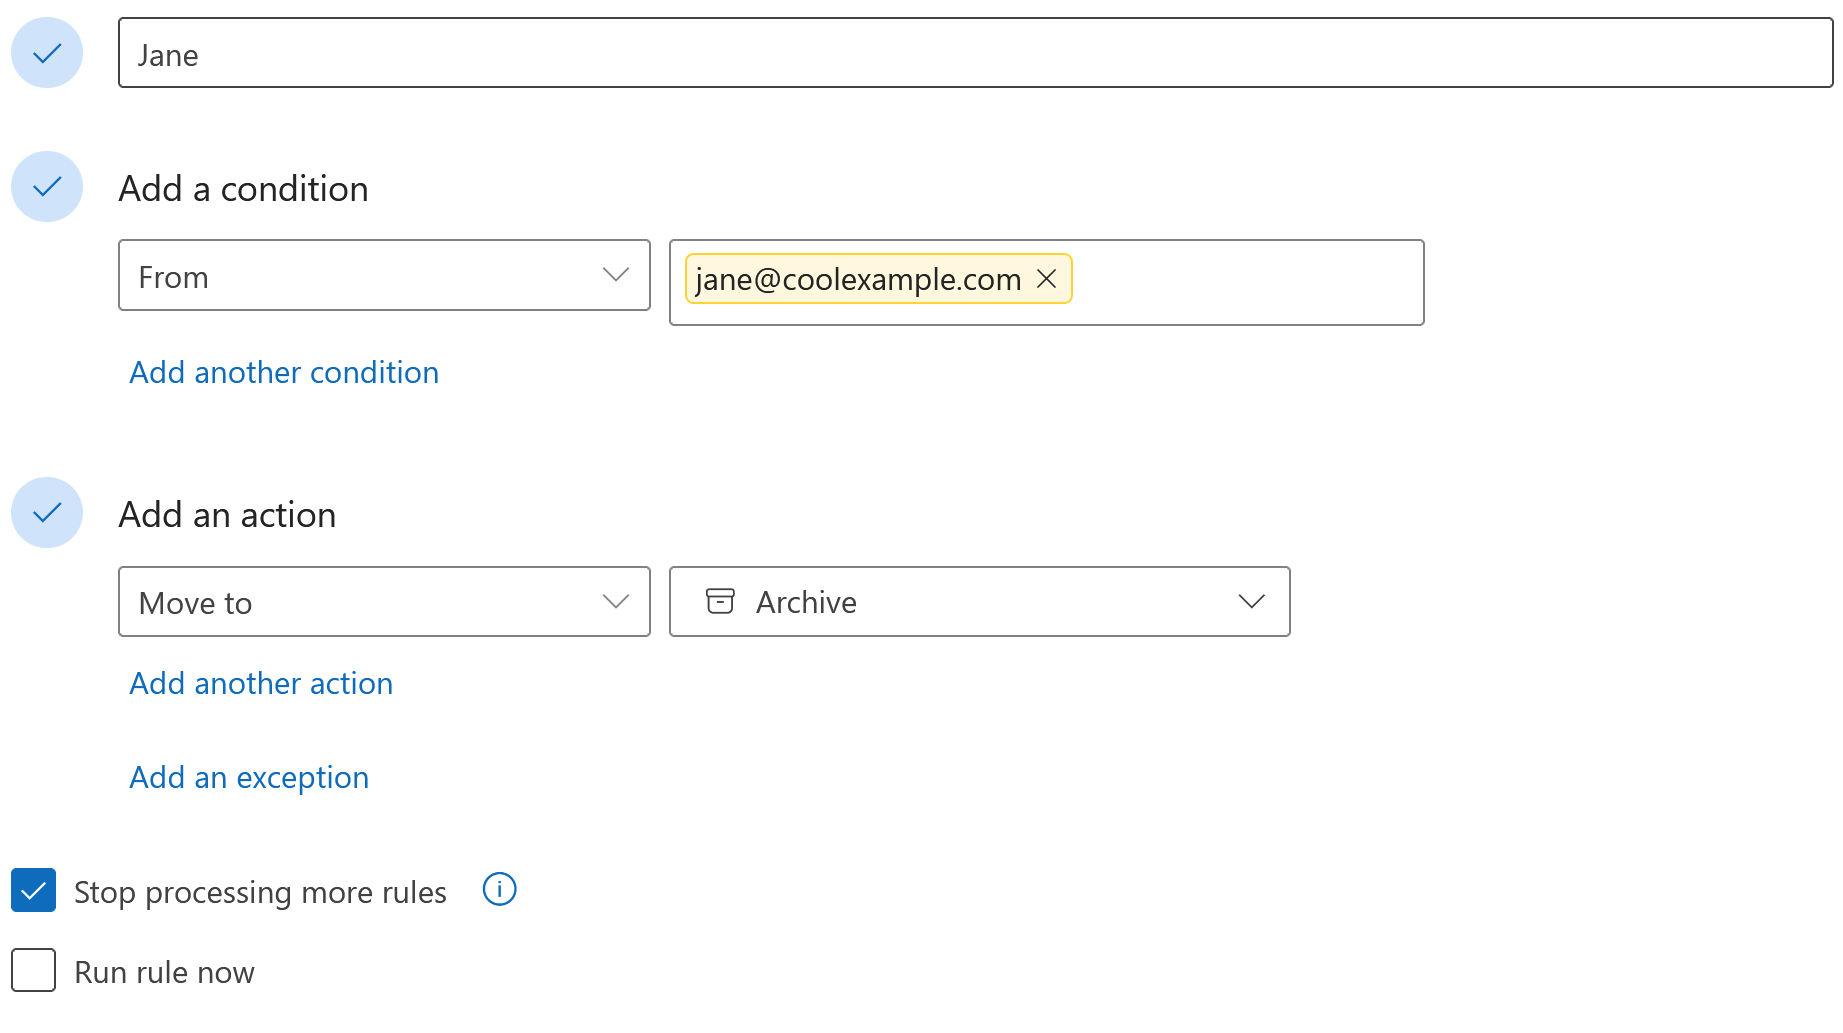
- 규칙의 이름을 입력합니다. 규칙이 수행하는 작업을 쉽게 식별하는 데 도움이되는 제목을 사용합니다.
- 규칙을 실행하도록 트리거하는 조건을 선택합니다. 예를 들어 모든 메시지 또는 특정 날짜 또는 보낸 사람의 메시지에 대해 규칙을 실행합니다.
- 규칙이 트리거 될 때 발생할 작업을 선택합니다. 예를 들어 규칙이 실행되면 메시지가 전달되거나 읽은 상태로 표시되거나 다른 폴더로 이동됩니다. 참고 : 설정하는 규칙 유형에 따라 예외 및 추가 조건을 추가 할 수 있습니다.
- 이 규칙 이후에 다른 규칙을 실행하지 않으려면 추가 규칙 처리 중지 옆의 확인란을 선택합니다. 이후의 규칙은 메시지에 적용 되더라도 무시됩니다.경고 :
예 : 상사의 이메일 메시지를 폴더 로 이동하는 규칙과 첨부 파일이있는 메시지를 삭제하는 규칙이있는 경우, 첨부 파일이있는 상사의 메시지는 이동 및 삭제되지 않도록 할 수 있습니다.
- (선택 사항)받은 편지함에 이미있는 메시지에 대해 규칙을 실행하려면 지금 규칙 실행 옆에있는 확인란을 선택합니다.
- 저장을 선택합니다.
기존 규칙 편집 또는 실행
- Outlook을 엽니다.
- 페이지 상단에서 설정 을 선택합니다.
- 메일 을 선택한 다음 규칙 을 선택합니다.
- 규칙 옆에서 다음을 수행 할 수 있습니다.
- 규칙 비활성화 또는 활성화 : 토글을 전환하여 규칙을 켜거나 끕니다.
- 지금 규칙 실행 : 모든 관련 메시지에 규칙을 적용합니다.
- 규칙 편집 : 규칙의 이름, 조건 또는 동작을 변경합니다.
- 규칙 삭제 : 수신 메일에 더 이상 적용되지 않도록 규칙을 삭제합니다.
클래식 Outlook
이 섹션의 단계가 작동하지 않으면 기본 Outlook을 사용하고 있지 않을 수 있습니다. 대신 새 Outlook 섹션의 단계를 시도해보세요.
새 규칙 만들기
- Outlook을 엽니다.
- 파일 , 규칙 관리 & 알림 , 새 규칙 순으로. 참고 : 프로필에 2 개 이상의 계정이 추가 된 경우 규칙 관리 & 선택한 후 계정을 선택하라는 메시지가 표시됩니다. 알림 .
- 템플릿을 선택합니다.
- 규칙 설명을 편집합니다.
- 다음을 선택합니다.
- 규칙을 실행할 조건을 선택합니다. 예를 들어 모든 메시지 또는 특정 날짜 또는 보낸 사람의 메시지에 대해 규칙을 실행합니다.
- 다음을 선택합니다.
- 규칙에 예외를 추가하고 다음을 선택합니다.
- 규칙의 이름을 입력합니다. 규칙이 수행하는 작업을 쉽게 식별하는 데 도움이되는 제목을 사용합니다.
- 이미 '받은 편지함'에있는 메시지에 대해 지금이 규칙 실행 옆의 확인란을 선택하여 기존 메시지에 규칙을 적용합니다. 규칙 및 적용되는 메시지 수에 따라 시간이 걸릴 수 있습니다.
- 마침을 선택합니다. Outlook이 실행되는 동안에 만 특정 규칙이 실행된다는 경고가 표시되면 확인을 선택합니다.
기존 규칙 편집 또는 실행
- Outlook을 엽니다.
- 파일 , 규칙 관리 & 알림 . 참고 : 프로필에 2 개 이상의 계정을 추가 한 경우 규칙 관리 & 알림 .
- 편집하거나 실행할 규칙 옆에있는 확인란을 선택합니다.
- 변경하려는 항목에 따라 옵션을 선택합니다.
- 활성화 또는 비활성화 : 규칙 옆에있는 확인란을 선택합니다.
- 규칙 변경 : 이름, 조건, 작업 또는 우선 순위를 변경합니다.
- 삭제 : 수신 메시지에 더 이상 적용되지 않도록 선택한 규칙을 삭제합니다. 규칙 삭제를 확인하려면 예를 선택합니다.
- 지금 규칙 실행 : 선택한 규칙을 모든 관련 메시지에 적용합니다. 규칙 및 적용되는 메시지 수에 따라 시간이 걸릴 수 있습니다.
이제 Mac 용 Outlook에는 새 Outlook과 레거시 Outlook의 두 가지 버전이 있습니다. 아래 단계를 계속 진행하기 전에 사용중인 버전을 확인 하세요.
새로운 전망
이 섹션의 단계가 작동하지 않으면 아직 새 Outlook을 사용하지 않을 수 있습니다. 대신 레거시 Outlook 섹션의 단계를 시도해보세요.
활성화하면 이메일 에센셜, 이메일 플러스 또는 온라인 비즈니스 에센셜과 같은 추가 이메일 플랜을 추가 할 수 있습니다.
새 규칙 만들기
- Outlook을 엽니다.
- Outlook을 선택한 다음 설정을 선택합니다.
- 이메일 아래에서 + 새 규칙 추가를 선택합니다.
- 규칙의 이름을 입력합니다. 규칙이 수행하는 작업을 쉽게 식별하는 데 도움이되는 제목을 사용합니다.
- 규칙을 실행하도록 트리거하는 조건을 선택합니다. 예를 들어 모든 메시지 또는 특정 날짜 또는 보낸 사람의 메시지에 대해 규칙을 실행합니다.
- 규칙이 트리거 될 때 발생할 작업을 선택합니다. 예를 들어 규칙이 실행되면 메시지가 전달되거나 읽은 상태로 표시되거나 다른 폴더로 이동됩니다. 참고 : 설정하는 규칙 유형에 따라 예외 및 추가 조건을 추가 할 수 있습니다.
- 이 규칙 이후에 다른 규칙을 실행하지 않으려면 추가 규칙 처리 중지 옆의 확인란을 선택합니다. 이후의 규칙은 메시지에 적용 되더라도 무시됩니다.경고 :
예 : 상사의 이메일 메시지를 폴더 로 이동하는 규칙과 첨부 파일이있는 메시지를 삭제하는 규칙이있는 경우, 첨부 파일이있는 상사의 메시지는 이동 및 삭제되지 않도록 할 수 있습니다.
- 받은 편지함에 이미있는 메시지에 대해 규칙을 실행하려면 지금 규칙 실행 옆에있는 확인란을 선택합니다.
- 저장을 선택합니다.
기존 규칙 편집
- Outlook을 엽니다.
- Outlook을 선택한 다음 설정을 선택합니다.
- 이메일 아래에서 규칙을 선택합니다.
- 규칙 옆에서 다음을 수행 할 수 있습니다.
- 규칙 비활성화 또는 활성화 : 토글을 전환하여 규칙을 켜거나 끕니다.
- 지금 규칙 실행 : 모든 관련 메시지에 규칙을 적용합니다.
- 규칙 편집 : 규칙의 이름, 조건 또는 동작을 변경합니다.
- 규칙 삭제 : 수신 메일에 더 이상 적용되지 않도록 규칙을 삭제합니다.
레거시 Outlook
이 섹션의 단계가 작동하지 않으면 기본 Outlook을 사용하고 있지 않을 수 있습니다. 대신 새 Outlook 섹션의 단계를 시도해보세요.
새 규칙 만들기
- Outlook을 엽니다.
- 홈 탭에서 규칙을 선택한 다음 규칙 만들기를 선택합니다 .
- 규칙의 이름을 입력합니다. 규칙이 수행하는 작업을 쉽게 식별하는 데 도움이되는 제목을 사용합니다.
- 새 메시지가 도착하면 에서 규칙을 실행할 조건을 편집합니다.
- 다음 작업 수행 에서 규칙이 트리거 될 때 발생할 작업을 선택합니다. 예를 들어 규칙이 실행되면 메시지가 전달되거나 읽은 상태로 표시되거나 다른 폴더로 이동됩니다. 참고 : 설정하는 규칙 유형에 따라 예외 및 추가 조건을 추가 할 수 있습니다.
- 동일한 조건을 충족하는 메시지에 다른 규칙을 적용하지 않음 옆에있는 확인란을 선택하면이 규칙 이후에 다른 규칙이 실행되지 않습니다. 이후의 규칙은 메시지에 적용 되더라도 무시됩니다.
- (선택 사항) 기본적으로 Enabled (활성화) 옆의 확인란이 선택됩니다. 지금 규칙을 활성화하지 않으려면 확인란의 선택을 취소합니다.
- 확인을 선택합니다.
기존 규칙 편집
- Outlook을 엽니다.
- 홈 탭에서 규칙을 선택한 다음 규칙 편집을 선택합니다 .
- 변경하려는 내용에 따라 다음을 완료합니다.
- 규칙 비활성화 또는 활성화 : 규칙을 두 번 클릭 한 다음 활성화 됨 옆에있는 확인란을 선택하거나 선택 취소합니다.
- 규칙 편집 : 규칙을 두 번 클릭 한 다음 규칙의 이름, 조건 또는 작업을 변경합니다.
- 규칙 삭제 : 규칙 – (빼기)를 선택한 다음 저장을 선택하여 규칙을 삭제하면 수신 메시지에 더 이상 적용되지 않습니다.
상세 정보
- 받은 편지함 규칙 만들기 및 편집에 대한 Microsoft의 문서 를 확인하세요.
- Outlook에서 부재 중 자동 회신 설정
- 내 Microsoft 365 이메일 주소의 이메일 전달 옵션