내 수신 허용 및 차단 된 발신자 목록 편집
참고 : 고급 이메일 보안은 영어로만 제공됩니다. 도움말 문서는 현지 언어로 제공되지만 제품 인터페이스, 기능 및 출력은 독점적으로 영어로만 제공됩니다.
특정 이메일 주소, 도메인 또는 IP 주소를 허용 목록 또는 차단 목록에 추가하여 격리로 보낼 이메일을 제어합니다. 허용 된 보낸 사람의 이메일은 격리 저장소로 이동하지 않지만 차단 된 보낸 사람의 이메일은 격리됩니다.
- GoDaddy 고급 이메일 보안 페이지에 로그인합니다 (GoDaddy 사용자 이름 및 암호 사용).
- 고급 이메일 보안에 로그인을 선택합니다. 로그인 페이지가 열립니다.
- 이메일 주소를 입력하고 로그인을 선택한 다음 Microsoft로 로그인을 선택합니다 .
- 화면의 지시에 따라 Microsoft 365 이메일 주소와 암호로 로그인합니다. 고급 이메일 보안 포털이 열립니다.
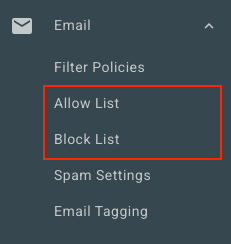
- 가장 왼쪽에서 이메일을 선택합니다. 발신자를 허용 목록에 추가할지 차단 목록에 추가할지에 따라 옵션을 선택합니다.
- 목록 허용 : 목록 허용을 선택합니다. 오른쪽 상단에서 Add Allow Entry (허용 항목 추가)를 선택합니다.
- 차단 목록 : 차단 목록을 선택합니다. 오른쪽 상단에서 Add Block Entry (블록 항목 추가)를 선택합니다.
- 다음 허용 또는 차단 아래에 이메일 주소, 도메인 또는 IP 주소를 입력합니다. 각 보낸 사람을 쉼표 또는 세미콜론으로 구분하거나 새 줄에 입력합니다.
- Save(저장)를 선택합니다.
모든 사용자의 허용 및 차단 목록 편집
관리자는 조직의 모든 사용자에 대한 허용 및 차단 목록을보고 편집 할 수 있습니다.
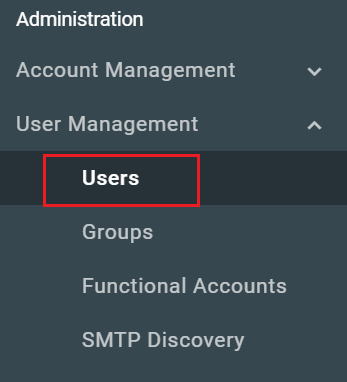
- 가장 왼쪽에서 사용자 관리 , 사용자 를 차례로 선택합니다.
- 편집 할 사용자의 이름 / 이메일 주소를 선택합니다.
- 페이지 상단에서 편집하려는 목록에 따라 허용 목록 또는 차단 목록을 선택합니다.
이 단계를 반복하여 각 사용자의 목록을보고 편집 할 수 있습니다.